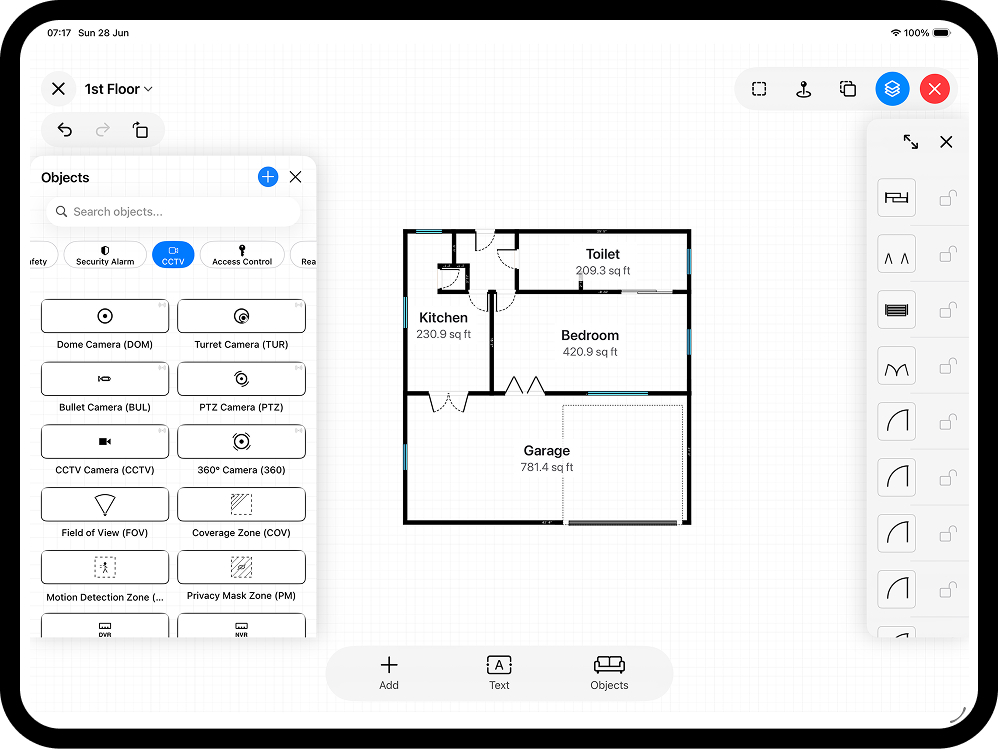
You don't need a LiDAR scanner, a Pro iPhone, or a single sheet of graph paper to make a proper floor plan. Apple only fits LiDAR to its Pro hardware - iPhone Pro and Pro Max models from the iPhone 12 Pro onwards, and iPad Pro from 2020 - so most iPhones on site can't scan a room automatically. It doesn't matter. With a basic laser measure (accurate to about ±1.5-2 mm) and a manual drawing workflow, you can produce a to-scale, exportable floor plan in minutes - and because it's the same editor either way, the result is every bit as clean as a scanned one. This guide walks the camera-free route from an empty canvas to a finished plan.
Why draw by hand?
LiDAR scanning is fast, but it's a Pro-only feature: no iPhone SE, no standard or Plus iPhone, no iPad Air can do it. Manual drawing has no hardware requirement and a few advantages of its own:
- It works on any iPhone or iPad - including the one already in your pocket.
- It's silent and unobtrusive on a client site - no sweeping a camera around an occupied living room.
- It can plan spaces that don't exist yet - a proposed extension, a re-fit, or a unit you're quoting from a landlord's rough dimensions.
- It copes with awkward conditions - mirrors, glazed partitions, and heavily cluttered rooms that confuse depth sensors are no problem for a laser measure and a keyboard.
And the output is worth the ten minutes. Rightmove's research found that adding a floor plan to a listing can lift buyer click-throughs by around 52%, and that roughly one in five buyers will ignore a listing without one. If you do have a LiDAR device, it's still worth knowing both workflows - our LiDAR scan vs manual drawing guide compares them in depth.
What you need on site
- A laser distance measure. Even entry-level models such as the Leica DISTO D1 (±2 mm) or Bosch GLM series (±1.5 mm) are far more precise than any floor plan needs. Measure at skirting height along a clear line of sight, and keep the beam level - a tilted shot reads long.
- A tape measure as backup for short runs, reveals, and openings under a metre.
- Your iPhone or iPad - draw as you measure rather than sketching on paper first, so mistakes surface while you can still re-check the wall.
Step 1 - Start from a room-shape template
Rather than drawing four walls from nothing, pick a starting shape. RoomPlot's manual path offers Square, Rectangle, and an L-shape in four orientations - choose the one closest to your room and you have an editable plan in one tap. From there you drag, add, and delete walls to match reality.
Step 2 - Set the real dimensions
Now make it accurate. Measure each wall on site and set its length in the editor by dragging or by typing an exact figure. Smart snapping and a 20 pt grid keep corners at clean right angles and respect 45° runs, so a freehand layout still comes out square. Work in metric or imperial - the on-plan dimensions and scale bar update as you go.
A repeatable measuring routine saves return visits:
- Work clockwise from the door. Measure every wall in order so nothing gets skipped, entering each length as you go.
- Measure wall-to-wall at skirting height, not across furniture.
- Cross-check with a diagonal. In a supposedly rectangular room, one corner-to-corner shot confirms the room really is square; if the diagonal disagrees with the maths, a corner isn't 90° and the L-shape or an extra wall segment will match reality better.
- Record the ceiling height once per room - you'll want it for the 3D view and for any space where restricted head height matters.
Step 3 - Add doors, windows, and openings
Drop in the openings from the object library and position them along each wall. A door placed in RoomPlot draws a proper swing - a gap in the wall, a leaf, and an arc hinged on the correct side - so the plan reads like a real architectural drawing rather than a sketch. Choose the door type that matches the real one (single, double, sliding, bifold, pocket) and set which way it opens. Two figures place any opening exactly: its width, and its distance from the nearest corner.
Step 4 - Label, check in 3D, and export
Add room labels - each one auto-calculates its area from the walls - drop in furniture and symbols if you need them, and add a North marker. You can flip a manually-drawn plan into 3D to set wall heights and sanity-check the layout as a live model; a mistyped wall length is often easier to spot in perspective than in plan.
When it's done, export exactly as you would a scanned plan: PNG or JPG at A4, 300 dpi, or 1080p; a single-page PDF or a branded multi-page PDF report; DXF for CAD handover; or USDZ if someone wants the 3D model. Attach notes, photos, or voice memos while you're still on site so the export captures everything the visit turned up.
If the plan is for a formal purpose
For marketing particulars, lease plans, or valuations, the measurement basis matters as much as the drawing. In the UK, RICS members measure residential property to the International Property Measurement Standards - IPMS 3B is the internal basis closest to the familiar Gross Internal Area - and RICS has been consolidating its measurement standards through 2025, so check the current edition before quoting an area basis on a formal document. State on the plan which basis you used and, where in doubt, confirm requirements with your client, lender, or a RICS-qualified surveyor. A hand-drawn plan is perfectly acceptable for these uses - what matters is that the measurements are real and the basis is declared.
The result is a real plan, not a sketch
A hand-drawn RoomPlot plan carries the same dimensions, the same symbol libraries, and the same export options as a scanned one - the only thing you skipped was the scanner. For non-Pro devices, proposed spaces, multi-floor projects built from record drawings, and quiet site visits, drawing by hand is often the better workflow anyway.
Give it a go: open RoomPlot, choose a room template, and type in your measured lengths - you'll have a clean, exportable floor plan without ever touching a scanner. More how-tos live on the guides index.