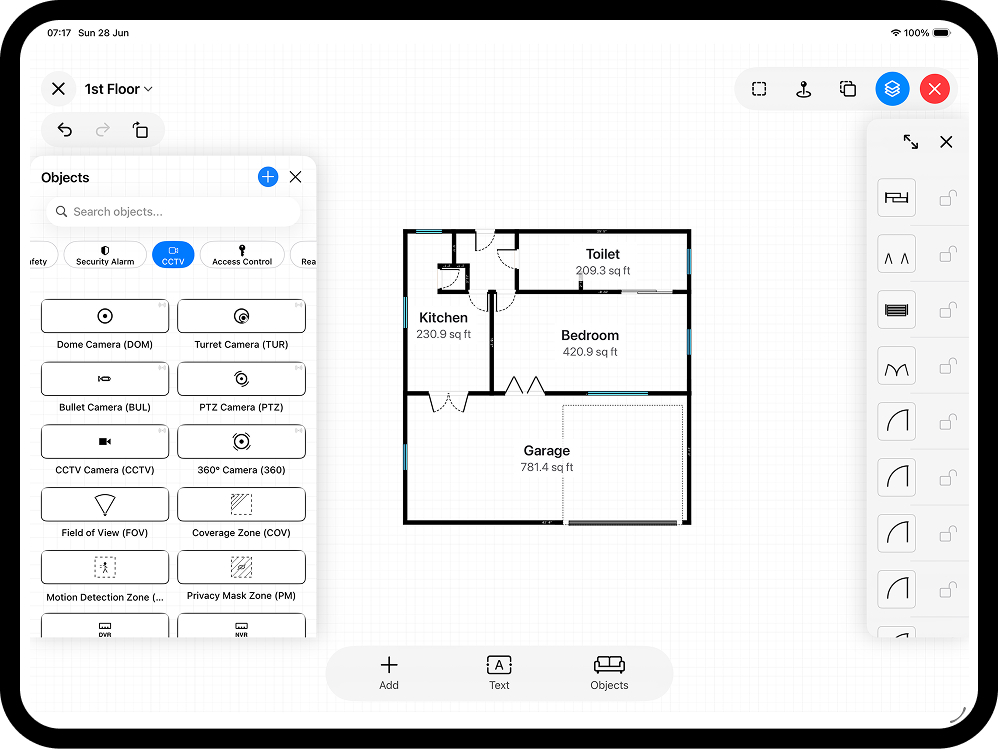
Most buildings you will ever survey have more than one storey, and a plan that stops at the ground floor only tells half the story. It also fails the paperwork test: an HMO licence application needs a scaled plan of every storey, the Smoke and Carbon Monoxide Alarm (England) Regulations 2022 require an alarm on each storey used as living accommodation, and RICS-style area figures are measured floor by floor. The good news is that a multi-floor plan is barely more work than a single one: in RoomPlot you add a floor, scan or draw it, and repeat - every level lives in the same project, stays aligned, and exports together as one branded report from your iPhone or iPad.
Why multi-floor plans need a system
Drawing each storey as a separate, unrelated file is how mistakes creep in: floors drift out of alignment, the stairs do not line up, and a client receives a stack of pages with no clear order. The fix is to treat the building as one project with several floors, each linked, consistently scaled and stacked in the right sequence.
There is a regulatory reason to get this right, too. Since October 2018 mandatory HMO licensing in England applies to qualifying houses in multiple occupation regardless of storey count - the old three-storey threshold is gone - and councils typically ask for a scaled floor plan of the whole property, room dimensions included, as part of the application. Requirements vary between local authorities, so always check your council's specification, but a clean per-storey plan set is the common denominator.
Capture each floor
Add a floor to the project for each storey and capture it the same way you would a single level. On a LiDAR-equipped iPhone or iPad Pro you can scan room after room with the AR scanner and let RoomPlot merge them into one structure per floor; on any device you can draw a floor by hand with smart snapping from a room-shape template. Switch between floors at any time - every level lives in the same project and auto-saves as you go.
- Start at the entrance level. Capture the ground floor first, including the hall and staircase, so upper floors have a reference to align against.
- Work one storey at a time. Finish scanning or drawing a level, name it clearly (Ground, First, Second - or Basement and Loft where relevant), then add the next floor.
- Verify with a tape or laser check. Confirm one long dimension per floor against a laser measure. RICS measurement guidance treats roughly ±1% as a sensible tolerance for internal areas taken with a laser device, so a single check dimension per storey catches most scaling errors early.
- Attach evidence as you go. Pin notes, photos and voice memos to rooms on each floor - meter locations, damp patches, alarm positions - so the survey record travels with the plan.
Keep the storeys aligned
- Line up the stairs. The staircase is the anchor that ties storeys together, so place it in the same position on each floor. If the stairwell on the first floor sits even half a metre from where it lands on the ground floor, one of the plans is wrong.
- Check the external walls. On most houses the perimeter of an upper floor matches the floor below, minus any single-storey extensions or bays. Big mismatches usually mean a mis-measured room, not a genuinely different footprint.
- Set a North marker once. A single north direction stamps onto every floor, so all levels share one orientation.
- Use one unit system. Metric or imperial applies across the whole project, so per-floor room areas add up correctly into a whole-building total - the figure that mirrors how a Gross Internal Area (GIA) is built up floor by floor for marketing and valuation.
Tip. RoomPlot can combine two or more normal floors into a single overlaid 2D plan, which is the quickest way to check that walls and stairwells line up between storeys. A combined floor is auto-named from its sources and cannot be re-combined.
Add compliance detail per storey
Multi-floor plans earn their keep on regulated jobs, because so many rules in England are written per storey. Under the Smoke and Carbon Monoxide Alarm (England) Regulations 2022, rented homes need at least one smoke alarm on every storey used as living accommodation, and a CO alarm in any room with a fixed combustion appliance (gas cookers excluded); local authorities can fine up to £5,000 for non-compliance. Larger HMOs are commonly specified with a mains-powered, interlinked Grade D1 system under BS 5839-6. RoomPlot's fire and security symbol libraries let you drop detectors, call points, CCTV coverage cones and access control onto the exact floor they belong to, so each storey of the export doubles as an alarm-location record.
Fire alarm grades and categories are ultimately a design decision for a competent person, and HMO standards vary by council - use the plan to record what is installed and where, and confirm the specification with your local authority or fire risk assessor.
Present the whole building
When it is time to hand over, exporting the whole building is a single action. RoomPlot's multi-page Report PDF runs at Full Project scope, so every floor appears in order with a cover page, a clickable table of contents, per-floor plans, an automatic symbol legend and a combined room-area summary - no assembling pages by hand. Pick a report preset (Standard, Client, Survey or Fire/Security), add your logo and signature, and the cover shows the total area across all floors, which is exactly what a client, letting agent or valuer wants to see first. Need other formats? Export individual floors as PNG or JPG at A4, 300 dpi or 1080p for listings, DXF for CAD handover, or USDZ to share the 3D model.
Multi-floor in 3D
Heights matter most across storeys, so the same project carries into 3D. Set wall heights and ceilings per floor, edit in a live 3D scene, and assemble a combined multi-floor model to check how the levels stack. It is the clearest way to show a client a whole house rather than a set of disconnected pages - and the fastest way to spot a stairwell or chimney breast that does not line up between storeys.
Ready to map a whole building? Browse more floor-plan guides or read how to create a floor plan step by step, then add your second floor today.